next配置文件(theme文件夹—next文件夹—config.yml)——主题配置文件
hexo配置文件(博客根目录文件夹内的—config.yml)——博客配置文件
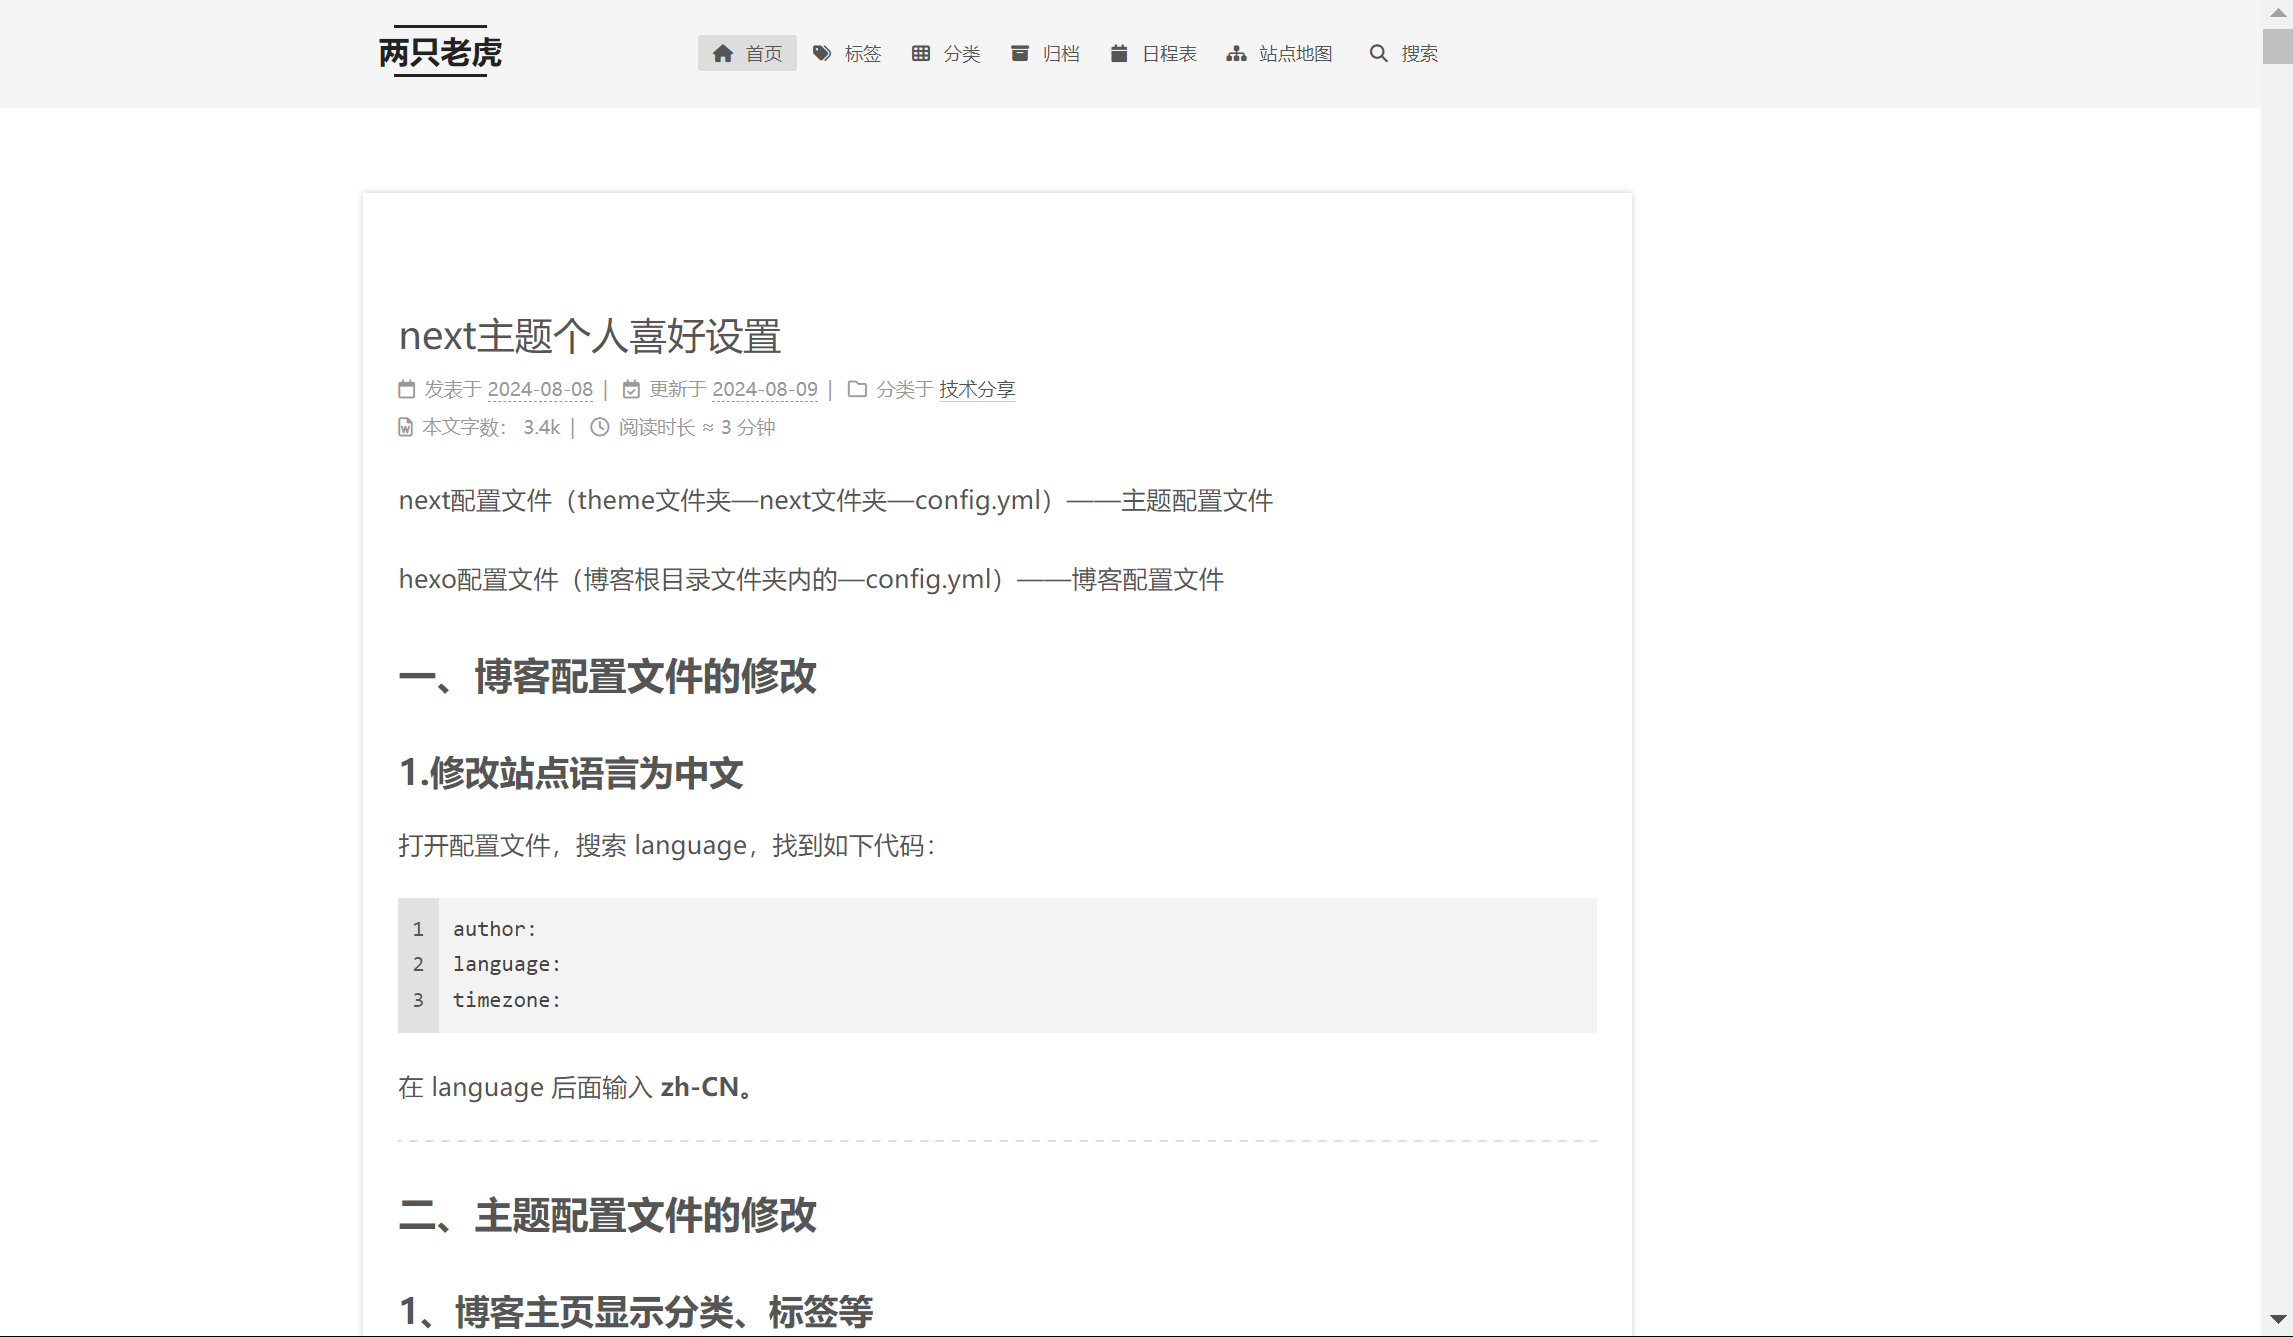
一、博客配置文件的修改 1.修改站点语言为中文 打开配置文件,搜索 language,找到如下代码:
1
2
3
author: language: timezone:
在 language 后面输入 zh-CN。
2、博客文章生成永久链接 这里有两种方法,一种使用hexo自带的,另一种需要安装插件。
方法一 hexo自带生成永久链接
例如我博客的首页,网址为https://github.com/aboucide/aboucide.github.io.git
那我的url就设置成这个https://github.com/aboucide/aboucide.github.io.git
root字段没有,就手动输入root: /
1
2
3
4
5
6
7
8
# 博客生成永久地址 URL url: https://github.com/aboucide/aboucide.github.io.git root: / permalink: :urldiy # 预设永久链接格式 permalink_defaults: # 默认永久链接 pretty_urls: # 美化永久链接 trailing_index: true trailing_html: true
如果你的博客首页网址是 url:http://www.mfm.com/blog
则你的 root:/blog
后续在每个文章的文件头那里输入字段
urldiy: /文件夹名称/分类名称/文章自定义名称.html
文件夹名称是 hexo将md文件转换成网页文件后上传到GitHub中的文件夹名称,可以随意取,程序会自动新建该文件夹,然后把html文件放进去。
分类名称 是自己在Category & Tag 中设置的中文对应的名称
1
2
3
4
5
6
7
8
9
10
11
12
13
14
15
16
17
# Category & Tag #把分类和标签与地址栏对应的英文在这进行分别设置,否则地址栏现实的是中文,分享出去的网址会是一大串转义字符。 default_category: uncategorized category_map: 笔记: note 高中化学: chemistry 实验视频: experiment-videos 资源分享: source 生活记录: liferecord 随笔: essay 常见电脑疑难的解决方案: solution 时事分享: epicwebevent #记录互联网精彩的事情 未分类: uncategorized tag_map: 视频: video
例如本篇文章的urldiy设置如下
urldiy: /blog/note/hexo/diy.html
即本文网址:aboucide.github.io/blog/note/hexo/diy.html
方法二 安装插件
【我没有使用这种方法,因此在这不做介绍】
3、修改博客默认模板 hexo博客的默认模板储存在:博客根目录/scaffolds/
什么情况下会使用到默认模板?
博客的文章储存在\source\_posts,因此我们写作的方法是
① 写好一份md文档,放进该文件夹中,再进行更新博客即可。
但是这种直接手动新建的md文件不能自带 ”文件头“ (front matter),这样子上传的md文件hexo博客是默认不识别的。必须要手动输入文件头,在md文件的开头输入---回车,再手动输入文章的各个信息才行。但是很明显每次写博客都手动输入文章信息就太麻烦了。
1
2
3
4
5
6
7
8
title: {{title}} date: {{date}} author: ZhongYuan urlname: {{title}} categories: 未分类 tags: - 无标签 description: 这里是显示在主页的文章描述。注意冒号后面有一个英文空格。
②使用官方自带的hexo命令,使用默认模板新建一个md文件。
这样新建的md文件就能自带文件头(front matter)。
使用方法 hexo new 模板名称 文件名称这是我的新博客.md文件,命令如下hexo new post 这是我的新博客 其中new可以缩写成nhexo n post 这是我的新博客
如果你输入的命令中不包含模板名称,则使用默认模板post。hexo n 这是我的新博客
官方自带的默认模板是post,代码如下
1
2
3
4
5
--- title: {{ title }} date: {{ date }} tags: ---
很显然使用hexo命令使用默认模板新建的md文件虽然有文件头,但包含的文件头信息还是太少了。
1
2
3
4
5
6
7
title: {{title}} date: {{date}} author: ZhongYuan categories: 未分类 tags: - 无标签 description: 这里是显示在主页的文章描述。注意冒号后面有一个英文空格。
我们可以①修改官方自带的post模板;②也可以自己新建一个模板文件放在/scaffolds/的文件夹内。 我这里采用的是方法②。
例如,我创建了一个名为 blog.md的模板,设置这个md的文件头的代码如下
1
2
3
4
5
6
7
title: {{title}} date: {{date}} author: ZhongYuan categories: 未分类 tags: - 无标签 description: 这里是显示在主页的文章描述。注意冒号后面有一个英文空格。
后续如何使用这个模板呢?
在博客的根目录文件夹内,打开cmd,使用hexo new blog 这是我的新文档,就会在\source\_posts新建一个这是我的新文档.md的文件
4、博客页面插入视频 使用插件hexo-tag-dplayer
https://easyhexo.com/3-Plugins-use-and-config/3-2-hexo-tag-dplayer/
5、博客页面分类 1、先去next主题配置文件,打开对应的功能。#号相当于注释。
1
2
3
4
5
6
7
8
9
menu: home: / || fa fa-home #about: /about/ || fa fa-user tags: /tags/ || fa fa-tags #标签 categories: /categories/ || fa fa-th #分类 archives: /archives/ || fa fa-archive #归档 #schedule: /schedule/ || fa fa-calendar #日程表 sitemap: /sitemap.xml || fa fa-sitemap #站点地图 # commonweal: /404/ || fa fa-heartbeat #公益404
2、可以自定义分类名称对应的网址
1
2
3
4
5
6
7
8
9
10
11
12
13
14
15
16
# Category & Tag #把分类和标签与地址栏对应的英文在这进行分别设置,否则地址栏现实的是中文,分享出去的网址会是一大串转义字符。 default_category: uncategorized category_map: 笔记: note 高中化学: chemistry 实验视频: experiment-videos 资源分享: source 生活记录: liferecord 随笔: essay 常见电脑疑难的解决方案: solution 未分类: uncategorized tag_map: 视频: video
3、每次写的博客如何设置分类名称
多级分类
1
2
3
4
5
6
7
8
9
10
11
--- title: {{title}} date: {{date}} author: ZhongYuan categories: - 博客自定义 - 主题修改 tags: - DIY description: 这里是显示在主页的文章描述。注意冒号后面有一个英文空格。 ---
这里创建了博客自定义分类,并且创建了下面的一个子分类主题修改,并且添加了一个子标签DIY
一篇文章属于多个分类
1
2
3
4
5
6
7
8
9
10
11
--- title: {{title}} date: {{date}} author: ZhongYuan categories: - [博客自定义,主题修改] tags: - DIY - blog description: 这里是显示在主页的文章描述。注意冒号后面有一个英文空格。 ---
这里创建的分类是博客自定义和主题修改,相当于这篇文章属于两个分类,同时这个文章加了两个标签。
二、主题配置文件的修改 1、博客主页显示分类、标签等 打开主题配置文件,修改menu对应的配置,“#”是注释的标志,删除代码前对应的#号即可激活。
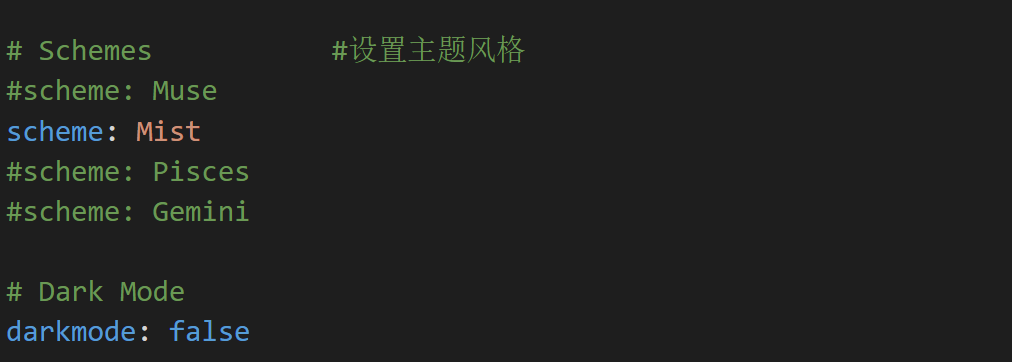
2、切换next显示的样式(默认提供4种选择) 找到Schemes板块,选择喜欢的主题,去掉#即可激活对应模式。
Dark mode是黑夜模式,把ture改成false就是白天模式。
3、隐藏网页底部 powered By Hexo / 强力驱动 (推荐)方法一:打开next主题配置文件,设置下面字段为false
1
2
# Powered by Hexo & NexT powered: false
方法二:打开 themes/next/layout/_partials/footer.swig
像我这样把这段代码的前后分别加上<!--和-->,即可实现去除底部推广。
1
2
3
4
5
6
7
8
9
10
<!-- {%- if theme.footer.powered %} <div class="powered-by"> {%- set next_site = 'https://theme-next.js.org' if theme.scheme === 'Gemini' else 'https://theme-next.js.org/' + theme.scheme | lower + '/' %} {{- __('footer.powered', next_url('https://hexo.io', 'Hexo') + ' & ' + next_url(next_site, 'NexT.' + theme.scheme)) }} </div> {%- endif %} {{- next_inject('footer') }} -->
3、文章添加阴影 打开 themes\next\source\css_common\components\post\index.styl
替换成如下代码
1
2
3
4
5
6
7
8
9
10
11
12
13
14
15
16
17
18
19
20
21
22
23
24
25
26
27
28
29
30
31
32
33
34
35
36
37
38
39
40
41
42
43
44
45
46
47
48
49
50
51
52
53
54
55
56
57
58
59
60
61
.rtl { &.post-body { p, a, h1, h2, h3, h4, h5, h6, li, ul, ol { direction: rtl; font-family: UKIJ Ekran; } } &.post-title { font-family: UKIJ Ekran; } } .post-button { margin-top: 40px; text-align: center; } .use-motion { if (hexo-config('motion.transition.post_block')) { .post-block{ visibility: hidden; margin-top: 60px; margin-bottom: 60px; padding: 25px; -webkit-box-shadow: 0 0 5px rgba(202, 203, 203, 1); -moz-box-shadow: 0 0 5px rgba(202, 203, 204, 1); } .pagination, .comments { visibility: hidden; } } if (hexo-config('motion.transition.post_header')) { .post-header { visibility: hidden; } } if (hexo-config('motion.transition.post_body')) { .post-body { visibility: hidden; } } if (hexo-config('motion.transition.coll_header')) { .collection-header { visibility: hidden; } } } @import 'post-collapse'; @import 'post-body'; @import 'post-gallery'; @import 'post-header'; @import 'post-nav'; @import 'post-footer'; @import 'post-widgets'; @import 'post-reward'; @import 'post-followme';
依次执行hexo cl && hexo g && hexo d ,即可看到效果。
添加阴影前,可以看到这里3篇文章,分割线基本没有,看起来感官不佳。
这里是修改后的,添加了文章阴影,好看了一些。
4、浏览页面显示当前浏览进度 打开 themes/next/_config.yml,搜索关键字 scrollpercent,把 false 改为 true。
会看到左下角显示当前页面滚动的百分比。
1
2
3
4
5
6
back2top: enable: true #打开返回页面顶部的按钮 # Back to top in sidebar. sidebar: true #是否设置把当前阅读百分比合并到侧边栏,选择false则阅读进度单独显示小的悬浮窗。 # Scroll percent label in b2t button. 显示当前页面滚动百分比 scrollpercent: true
图下为更新前。
更下为更新后。可以看到左下角多了一个浏览进度百分比。
还可以设置页面顶部的浏览进度条
1
2
3
4
5
6
7
8
9
10
# Reading progress bar 页面顶部显示阅读进度条 reading_progress: enable: true # Available values: left | right start_at: left # Available values: top | bottom position: top reversed: false color: "#37c6c0" height: 3px
5、Local Search本地搜索 5.1 安装插件hexo-generator-searchdb,执行以下命令:
npm install hexo-generator-searchdb --save
5.2 修改博客的配置文件,新增以下内容到任意位置:
search:
5.3 编辑 主题配置文件,启用本地搜索功能:
打开主题的配置文件,把# local search的enable改成true。
1
2
3
# Local search local_search: enable: true
修改后,如下图多了搜索功能。
6、修改博客的相关图标 博客的默认图标在对应主题的文件夹内/themes/next/source/images
只需要把你想要的图片修改成一模一样的名字并替换原文件即可。
7、打开博客分享按钮 打开主题配置文件,修改成如下代码
1
2
3
4
5
6
7
8
9
10
#打开网站分享的按钮,会显示在文章的底部 # AddToAny Share. See: https://www.addtoany.com addtoany: enable: true buttons: - facebook - twitter - telegram - wechat - qzone
8、文章加密访问 这里提供两种方法,一种是next自带的加密;另一种需要安装加密插件。
我本人使用的加密是第二种方法。
8.1 next主题自带的加密
8.2 使用加密插件hexo-blog-encrypt
github有使用说明,很简单。
9、文章字数统计,阅读时间推荐 打开主题配置文件,修改post_wordcount对应如下代码即可。
1
2
3
4
5
6
7
8
9
10
11
post_wordcount: item_text: true wordcount: true # 单篇 字数统计 min2read: true # 单篇 阅读时长 totalcount: false # 网站 字数统计 separated_meta: true
10、如何让首页的文章部分显示 这里提供两种方法。
首先确保主题配置文件中的excerpt_description是true(next主题安装后默认是true)。
1
2
# Use `description` in front-matter to specify post excerpt. excerpt_description: true
10.1 方法一:写博客的概述
在文章的开头处,添加一个description,这样首页只会显示描述的内容,不会显示正文。
1
2
3
4
5
--- title: 让首页显示部分内容 date: 2020-02-23 22:55:10 description: 这是显示在首页的概述,正文内容均会被隐藏。 ---
如果description的后面没有文字,则又会默认全部显示正文内容。
10.2 方法二:文章截断
在需要截断的地方加入以下代码,
这样主页看到的那篇文章就只显示到这串代码之前的内容。(推荐使用方法二)
10.3 不常用的方法:使用加密插件hexo-blog-encrypt
但是必须得加密码,不加密码,无法实现部分内容显示。
修改前,打开首页,文章就是默认全部展开的,非常不美观。
11. 代码块风格设置 并 增加代码块“复制”按钮 打开代码块风格预览网站 https://theme-next.js.org/highlight/
我选择的Engine是hightlight;Theme是atom-one-light。
在博客站点配置文件进行设置如下代码,选择highlight的enable:设置成 true
1
2
3
4
5
6
7
8
9
10
11
12
13
14
15
#下面是设置博客文章中代码块的渲染引擎, # hightlight和prismjs只能二选一打开enable的true,另一个选择false highlight: enable: true line_number: true auto_detect: false tab_replace: '' wrap: true hljs: false prismjs: enable: false preprocess: true line_number: true tab_replace: ''
在next主题配置文件设置如下代码theme: atom-one-light
1
2
3
4
5
6
7
8
9
10
#这里是博客里面的代码块的样式 codeblock: # Code Highlight theme # All available themes: https://theme-next.js.org/highlight/ theme: light: atom-one-light dark: atom-one-light prism: light: prism dark: prism-dark
打开代码块复制按钮
在next主题配置文件,打开copy_button的enable设置成true
1
2
3
# Add copy button on codeblock 增加代码块复制按钮 copy_button: enable: true
12. 设置页面加载特效 页面有时加载缓慢,可以设置一个当前页面加载的进度条显示,避免焦虑。
打开next主题的配置文件,找到pace片段,enable的值设置成true,可以自定义color和theme的值。
1
2
3
4
5
6
7
8
9
10
11
12
# Progress bar in the top during page loading. #这里是设置博客加载的进度条,可以访问下面的网址,查看各个效果的例子。 # For more information: https://github.com/CodeByZach/pace pace: enable: true # All available colors: # black | blue | green | orange | pink | purple | red | silver | white | yellow color: green # All available themes: # big-counter | bounce | barber-shop | center-atom | center-circle | center-radar | center-simple # corner-indicator | fill-left | flat-top | flash | loading-bar | mac-osx | material | minimal theme: loading-bar
13. 修改博客文章侧边栏的圆角和边距 https://cs-cshi.github.io/hexo-blog/Hexo-NexT%20%E8%AE%BE%E7%BD%AE%E5%9C%86%E8%A7%92/
打开 blog_root/source/_data/variables.styl ,
没有这个文件夹就手动新建该文件夹 _data,并新建该文件variables.styl。
打开themes/next/source/css/_variables/Gemini.styl,把内容复制到上面的文件中。
似乎_date文件夹需要自建,用于自定义?
根据启用的不同主题,选择相应的文件。这里修改的是Gemini.styl。
在文件中修改代码:
1
2
$border-radius-inner = 0 0 10px 10px; $border-radius = 10px;
进入next主题配置文件,并搜索 custom_file_path 字段,将variable行取消注释。
1
2
3
4
5
6
7
8
9
10
11
12
13
14
# Define custom file paths. 自定义页面风格,取消默认配置 # Create your custom files in site directory `source/_data` and uncomment needed files below. custom_file_path: #head: source/_data/head.njk #header: source/_data/header.njk #sidebar: source/_data/sidebar.njk #postMeta: source/_data/post-meta.njk #postBodyStart: source/_data/post-body-start.njk #postBodyEnd: source/_data/post-body-end.njk #footer: source/_data/footer.njk #bodyEnd: source/_data/body-end.njk variable: source/_data/variables.styl #mixin: source/_data/mixins.styl #style: source/_data/styles.styl
14. 给博客添加人数访问统计 进入主题配置文件,并搜索 busuanzi_count 字段,设置如下:
1
2
3
4
5
6
7
8
busuanzi_count: enable: true total_visitors: true total_visitors_icon: fa fa-user total_views: true total_views_icon: fa fa-eye post_views: true post_views_icon: far fa-eye
为了增加可读性,可以增加如下设置。
进入 Hexo/themes/next/layout/_partials 目录,打开 footer.njk 文件。
搜索 busuanzi_value_site_uv字段,修改值为:
1 访客人数共计:<span id="busuanzi_value_site_uv"></span> 人
搜索 busuanzi_value_site_pv 字段,修改值为:
1 本站浏览总量共计:<span id="busuanzi_value_site_pv"></span> 次
15.博客文章置顶功能 16. 博客文章摘要显示图片 三、可能遇到的问题 1、修改主题相关的内容后,自动部署不加载css,导致网页只有文字,没有风格了。 解决办法
打开博客站点配置文件,修改url,并设置root字段的内容
例如我博客的首页,网址为https://github.com/aboucide/aboucide.github.io.git
那我的url就设置成这个https://github.com/aboucide/aboucide.github.io.git
root字段没有,就手动输入root: /
1
2
3
## Set your site url here. url: https://github.com/aboucide/aboucide.github.io.git root: /
如果你的博客首页网址是 url:http://www.mfm.com/blog
则你的 root:/blog
再次重新部署即可。


 wechat
 alipay
